![]()
How to Download Android Telephone Photos to Your Computer
Techlicious editors independently review products. To aid support our mission, nosotros may earn affiliate commissions from links contained on this page.
You can easily download all of your photos or choose a select few to transfer from your Android phone to your computer. Here's how to download Android telephone photos to a Windows x or Mac computer.
How to download Android photos to a Windows 10 PC
The easiest way to move your photos from your Android phone to your Windows PC is to utilize the Photos app that comes pre-loaded in Windows ten. With the Photos app, you lot can import all of your photos, or but some of them, and choose the folder where you want them transferred to, so yous know where to discover them later.
- Unlock your phone.
- With a USB cable, connect your phone to your computer.
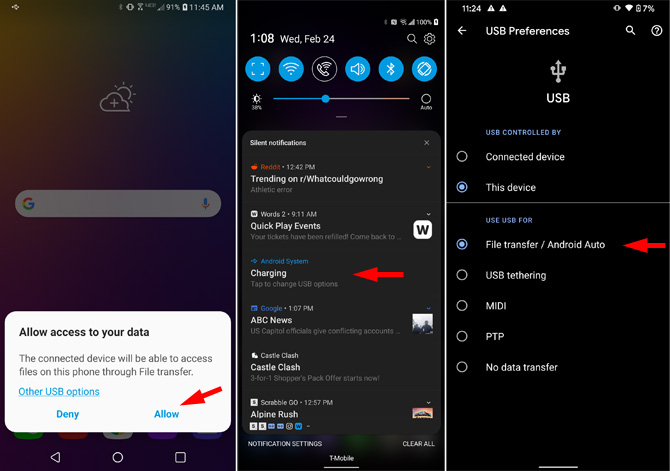
- On your phone, tap the notification that pops upwardly for USB settings, charging, or data access. Or, if you lot don't come across a notification, go into Settings and search for "USB Preferences." Depending on your Android device, you lot may run into "Use USB connection for," "Allow access to your information," or simply "Charging" with "Tap to change USB options" below.
- Select "Allow," "File Transfer," or "Photo Transfer" to authorize data transfer to your computer.
- Open the Photos app on your computer.
- On the peak right of your screen, click the "Import" push. It will ask if yous want to import from a Binder or a Continued Device.
- Select "Connected Device." Once yous cull "Continued Device," the computer will look for your device and display the photos on information technology. You can import all the images, all of the images from your last import, or just a few select images
- On this screen, you lot can also select where you lot'd like the images to go. Click on "Alter Destination" and choose your desired folder.
How to download Android phone photos to a Mac
If you want to download photos to a Mac, we recommend using the Photos App on your calculator.
- Unlock your telephone.
- With a USB cablevision, connect your phone to your figurer.
- On your phone, tap the notification that pops upward for USB settings, charging, or data access. Or, if you don't see a notification, go into Settings and search for "USB Preferences." Depending on your Android device, yous may run into "Use USB connection for," "Permit access to your information," or simply with "Tap to change USB options" beneath.
- Select "Allow," "File Transfer," or "Photo Transfer" to authorize data transfer to your figurer.
- Open the Photos app on your Mac (if it doesn't open automatically), and yous'll see a screen with all the photos on your continued device. You may take to click your device'south name in the Photos sidebar if it doesn't immediately populate.
- Select the photos yous want to transfer to your Mac. Click "Import Selected" if you're going to move a group of photos, or y'all can choose to import "All New Photos" to brand certain your nearly recent photos are backed up onto your Mac.
If you're looking for the photos you've imported, you lot'll find them stored in the Photos Library in the Pictures folder.
How to download Android phone photos to your computer if yous back them up to Google Photos
The default app for photos on many Android phones is the Google Photos app, which you tin prepare to backup all of your photos and videos to Google Photos online. (You'll observe that selection in the Google Photos app by tapping your account contour photo or initial, selecting Photos settings > Backup & sync, and tapping "Fill-in & sync" on.) Here's how to download photos on Google Photos to your computer.
- Get to Google Photos on your computer
- Select one or more than photos by hovering over the upper left corner and clicking the checkmark when it appears. Now, you'll see circles in the upper left of your photos, which you lot can click to select. Click on more circles to select more photos. Belongings downwards the shift key and and so clicking in a circle volition select all photos between the final select photo and the one you just clicked. You tin can select hundreds at a time this mode.
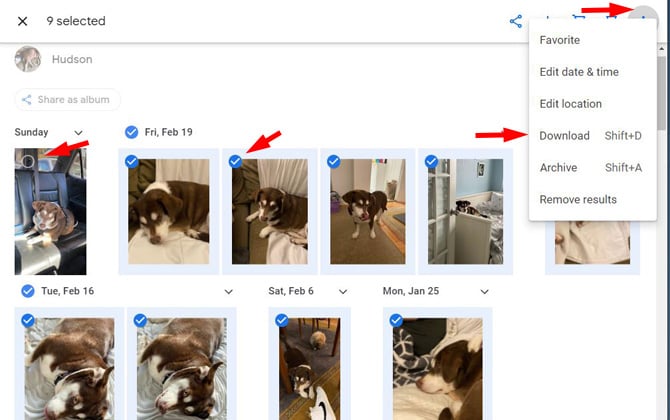
- Once y'all've selected your photos, click the triple dot menu icon in the upper right.
- Select Download. You can choose where to salvage the file on your computer.
- Your photos volition exist saved to a Nix file.
- Double click on the Nil file yous simply saved.
- Select "Excerpt all" and choose where you desire your photos saved.
[Image credit: Suzanne Kantra/Techlicious]
For the past twenty+ years, Suzanne Kantra has been exploring and writing most the world's most heady and important science and engineering issues. X years ago, she founded Techlicious, which serves the function of that tech-savvy friend you tin count on to share tips and tricks to go the virtually out of technology; whether that'southward saving time in our hectic schedules, discovering new means to enjoy our personal interests, or keeping upwards with the latest engineering trends and styles. Before that, Suzanne was the Technology Editor for Martha Stewart Living Omnimedia, where she hosted the radio show "Living with Technology." Previously, she served as Applied science Editor for Popular Scientific discipline Magazine. She has been featured on CNN, CBS, and NBC.
DOWNLOAD HERE
Posted by: arnoldnevered91.blogspot.com
Post a Comment